From BigQuery to Sheets using Workflows from Google Cloud
It happened a few times to encounter this situation: starting from a very simple report, like a agent sales report, someone asks for a detailed report. And the fastest solution is to agree on the parameters over e-mail or chat and do a simple database query export to csv and share the results. Next month same situation, same problem and same solution. Turns out there is a very simple way to automate all this using Google Cloud Workflows and Google Sheet and to give the control back the the final user.
Prerequisites
- GCP project with billing enabled. If you don’t have one then sign-in to Google Cloud Platform Console and create a new project
- Access to a standard internet browser
The setup
First you will need to login to Google Cloud Platform Console and activate Cloud Shell. Most of the commands described in this post can be executed using the Cloud Shell Console.
Run the following script:
PROJECT_ID=codelab1-244421
REGION=europe-west3

gcloud services enable drive.googleapis.com --project $PROJECT_ID
gcloud services enable sheets.googleapis.com  --project $PROJECT_ID

PROJECT_NUMBER=$(gcloud projects list \
    --filter="$PROJECT_ID" \
    --format="value(PROJECT_NUMBER)")
SERVICE_ACCOUNT="$PROJECT_NUMBER-compute@developer.gserviceaccount.com"
echo "SERVICE_ACCOUNT=$SERVICE_ACCOUNT"
echo "PROJECT_NUMBER=$PROJECT_NUMBER"
Next you need to create a new folder in Google Drive and name it “workflow-demo”.

The last segment of the url represents the folder id and you must save this as variable.
FOLDER_ID=12VMozM-LWZnBICs3N5R25jlOZKzEMQq2
For a successful setup you need to grant access to folder for the service account used to run the workflow. The service account should be at the form $PROJECT_NUMBER-compute@developer.gserviceaccount.com and you can copy the value from the previous command.
Click on the info icons to open the details of the folder and then click on the Manage access button.
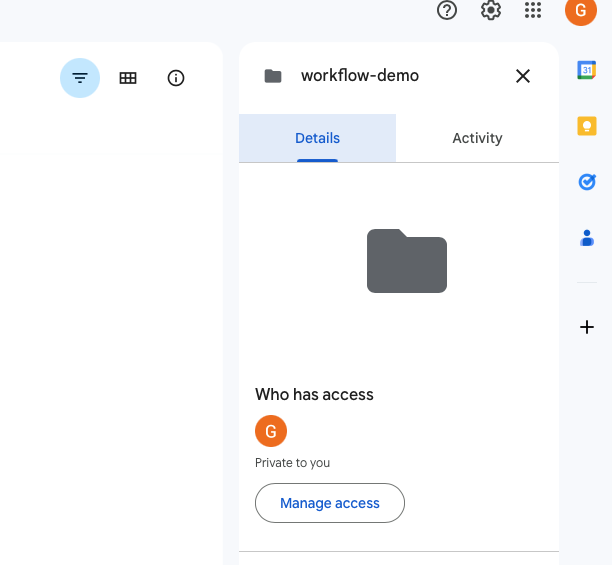
Add the service account as “Editor”.
This setup includes also the option to send a chat message when the export is completed and for this we need a webhook address.
Navigate to Google Chat and create a new space and name it “Workflow demo”.
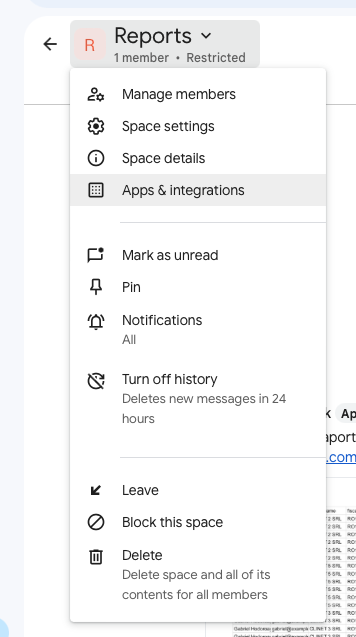
Navigate to “Apps & Integrations” and then setup a new webhook and copy the url into a variable.
Note: The option to set a webhook for a chat space is available only for Google Workspace users and it does not work for personal gmail addresses.
WEBHOOK_URL="https://chat.googleapis.com/v1/spaces/AAAA09lLLlo/messages?key=AIzaSyDdI0hCZtE6vySjMm-WEfRq3CPzqKqqsHI&token=MF9CHs8CMYYrNhvigNXHi5okcromvA1us9Ny8dHdCiw"
Now we have everything ready to setup our workflow
cat << 'EOF' | sed "s/FOLDER_ID/$FOLDER_ID/g" | sed "s@WEBHOOK_URL@${WEBHOOK_URL//&/\\&}@g" > workflow-create-report.yaml
main:
  params: [input]
  steps:
    - init:
        assign:
          - folder_id: 'FOLDER_ID'
          - drive_url: 'https://www.googleapis.com/drive/v3/files/'
          - drive_auth_scope: 'https://www.googleapis.com/auth/drive'
          - agent_id: ${input.agentId}
          - from: ${input.from}
          - to: ${input.to}
          - limit: 500
          - webhook_url: WEBHOOK_URL
    - create_sheet:
        call: googleapis.sheets.v4.spreadsheets.create
        args:
          body:
            properties:
              title: ${"agent-data-" + agent_id + "_" + from + "-" + to}
          connector_params:
            scopes: 'https://www.googleapis.com/auth/drive'
        result: resp
    - get_sheet_info:
        call: http.get
        args:
          url: '${drive_url + resp.spreadsheetId}'
          query:
            fields: parents
          auth:
            type: OAuth2
            scopes: '${drive_auth_scope}'
        result: sheet_info
    - move_sheet:
        call: http.patch
        args:
          url: '${drive_url + resp.spreadsheetId}'
          query:
            addParents: '${folder_id}'
            removeParents: '${sheet_info["body"]["parents"][0]}'
          auth:
            type: OAuth2
            scopes: '${drive_auth_scope}'
        result: resp
    - assign_sheetid:
        assign:
          - sheetId: ${resp.body.id}
    - scriptCreation:
        assign:
        - script000: ${"SELECT a.name, a.email, c.name, c.fiscal_code, p.name, id.qty, id.price
                 FROM `codelab1-244421.public.invoice` i
                 INNER JOIN `codelab1-244421.public.invoice_details` id ON i.id = id.invoice_id
                 INNER JOIN `codelab1-244421.public.products` p ON id.product_id = p.id
                 INNER JOIN `codelab1-244421.public.clients` c ON i.client_id = c.id
                 INNER JOIN `codelab1-244421.public.agents` a ON i.agent_id = a.id "}
        - script001: ${"WHERE i.agent_id = " + agent_id + " AND i.issue_date BETWEEN '" + from + "' AND '" + to + "'"}
    - runQuery:
        call: googleapis.bigquery.v2.jobs.query
        args:
            projectId: ${sys.get_env("GOOGLE_CLOUD_PROJECT_ID")}
            body:
                useLegacySql: false
                query: ${script000 + script001}
        result: queryResult
    - init_header_row:
        assign:
        - rows:
            - ["agent_name","agent_email","client_name","fiscal_code","product_name","qty","price"]
    - process_query_result:
        for:
            value: row
            in: ${queryResult.rows}
            steps:
            - process_each_row:
                assign:
                - agent_name: ${row.f[0].v}
                - agent_email: ${row.f[1].v}
                - client_name: ${row.f[2].v}
                - fiscal_code: ${row.f[3].v}
                - product_name: ${row.f[4].v}
                - qty: ${row.f[5].v}
                - price: ${row.f[6].v}
                - row: ["${agent_name}", "${agent_email}","${client_name}","${fiscal_code}","${product_name}","${qty}","${price}"]
                - rows: ${list.concat(rows, row)}
    - clear_existing_values:
        call: googleapis.sheets.v4.spreadsheets.values.clear
        args:
            range: "Sheet1"
            spreadsheetId: ${sheetId}
        result: clearResult
    - update_sheet:
        call: googleapis.sheets.v4.spreadsheets.values.update
        args:
            range: ${"Sheet1!A1:Q" + (limit + 1)}
            spreadsheetId: ${sheetId}
            valueInputOption: RAW
            body:
                majorDimension: "ROWS"
                values: ${rows}
        result: updateResult
    - get_message:
        call: http.post
        args:
          url: ${webhook_url}
          body:
            text: ${"A fost generat un raport nou 'agent-data-" + agent_id + "_" + from + "-" + to + "'\nhttps://docs.google.com/spreadsheets/d/" + updateResult.spreadsheetId}
          headers:
            Content-Type: "application/json; charset=UTF-8"
        result: response
    - return_value:
        return: ${response}
EOF
and deploy it.
gcloud workflows deploy workflow-create-report \
    --source=workflow-create-report.yaml \
    --project=$PROJECT_ID \
    --location=$REGION \
    --service-account=$SERVICE_ACCOUNT
You can go to Workflows Console to check if the workflow has been created.
Next step is to create a Worksheet to setup our parameter and to trigger the workflow that we just created.
Go to Google Drive to folder “workflow-demo” and create a new worksheet.
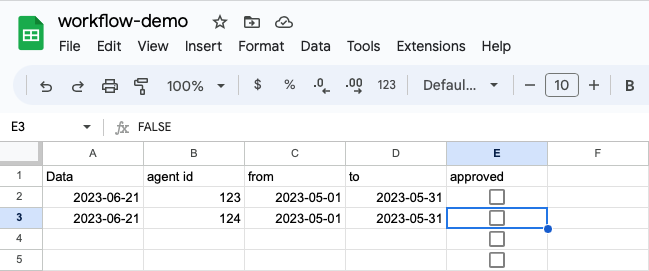
Add the data into the following format:
Data	agent id	from	to	approved
2023-06-21	123	2023-05-01	2023-05-31
2023-06-21	124	2023-05-01	2023-05-31
make sure that the column approved contains checkboxes (select cells -> menu -> insert -> checkbox)
The worksheet should look like this
Next navigate to Menu -> Extensions -> Apps Script and paste the following code snippet
const PROJECT_ID = "codelab1-244421";
const REGION = "europe-west3";
const WORKFLOW = "workflow-create-report";

function handleEdit(e) {
  var range = e.range.getA1Notation();
  var sheet = e.source;

  if (range.length > 1 && range[0] === 'E') {
    if (e.value == "TRUE") {
      Logger.log("Approved checkbox: true");

      var row = range.slice(1)

      var idAgent = sheet.getRange('B' + row).getCell(1, 1).getValue()
      var from = Utilities.formatDate(sheet.getRange('C' + row).getCell(1, 1).getValue(), "GMT+3", "yyyy-MM-dd")
      var to = Utilities.formatDate(sheet.getRange('D' + row).getCell(1, 1).getValue(), "GMT+3", "yyyy-MM-dd")

      const executionPayload = {
        "argument": "{\"agentId\": \"" + idAgent + "\", \"from\": \"" + from + "\", \"to\": \"" + to + "\"}"
      };

      approve(executionPayload);
    }
    else {
      Logger.log("Approved checkbox: false");
    }
  }
}

function approve(executionPayload) {
  const authToken = ScriptApp.getOAuthToken()
  const headers = {
    "Authorization": "Bearer " + authToken
  };

  Logger.log("authToken=" + authToken)

  const params = {
    "method": 'post',
    "contentType": 'application/json',
    "headers": headers,
    "payload": JSON.stringify(executionPayload)
  };

  const url = "https://workflowexecutions.googleapis.com/v1/projects/" + PROJECT_ID + "/locations/" + REGION + "/workflows/" + WORKFLOW + "/executions";

  Logger.log("Workflow execution request to " + url);
  var response = UrlFetchApp.fetch(url, params);
  Logger.log(response);
}
Make sure you update the PROJECT_ID and REGION to match yours.
While still on the “Apps Scrip” page navigate to “Project Setting” do the following actions:
- check the
Show "appsscript.json" manifest file in editoroption - update the GCP project section to match your project. You can get the project number associated with your project if you go back to the Cloud Shell terminal window and type
echo $PROJECT_NUMBER.
Navigate back to the “Editor” section of the “Apps Scrip” and update the appscript.json file to have the following content.
{
  "timeZone": "Europe/Bucharest",
  "dependencies": {
  },
  "exceptionLogging": "STACKDRIVER",
  "runtimeVersion": "V8",
   "oauthScopes": [
    "https://www.googleapis.com/auth/spreadsheets",
    "https://www.googleapis.com/auth/script.external_request",
    "https://www.googleapis.com/auth/cloud-platform"
  ]
}
The oauthScopes is the relevant one for our case.
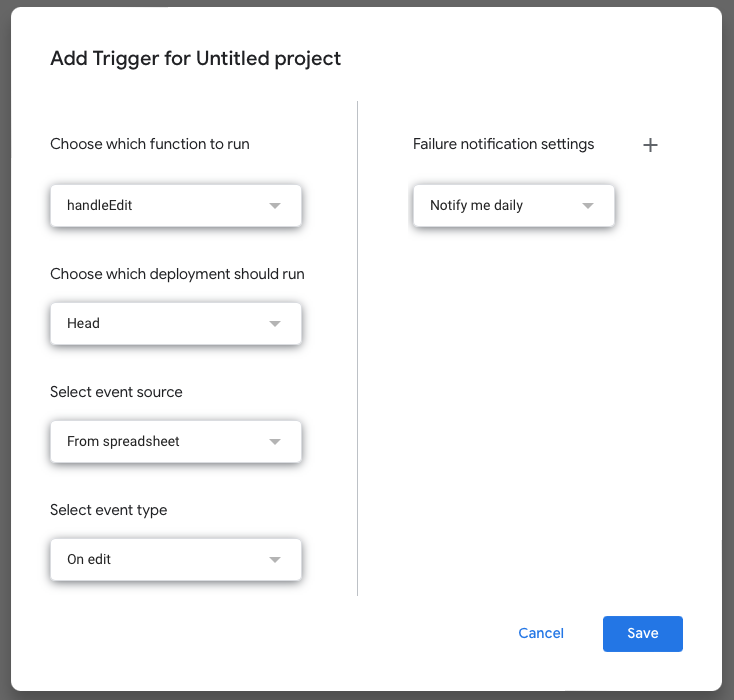
Next navigate to “Triggers” section of the “Apps Script” and configure a new trigger as follows:
You will be asked to authorize the access to this script and you need to grant the access otherwise the export will fail.
Go back on the “Worksheet-dome” worksheet and click on the approve column for the first row.
If everything is worked well you should be able to see a new worksheet created in the folder and also you should receive a message on the space chat.
You can check at Workflows Console if the workflow has been executed successfully or you can debug the issues.
Conclusion
With a little bit of effort and knowledge you can create simple applications that gives back the control to the final users and get rid of the boring toil. On top of that the most important feature of this setup is that is 100% secure with very little effort. Only the authorized people will be able to trigger of see the exported data.