Fail2ban for Google Cloud Armor
Cloud Armor is the WAF from Google Cloud. It has many features but the one that is relevant for the current situation is the ability to create security rules and block traffic based on the client IP. Manual configuration is ok but, there are situations when application specific logic is the source of the security rule. For example, the number of new users created from the same IP address.
Fail2ban is a very well known daemon for linux used to ban too many failed authentication attempts. This tool became the inspiration to create a similar solution but within the context of a cloud platform, a simple solution to update a security policy based on specific application logic.
Solution overview
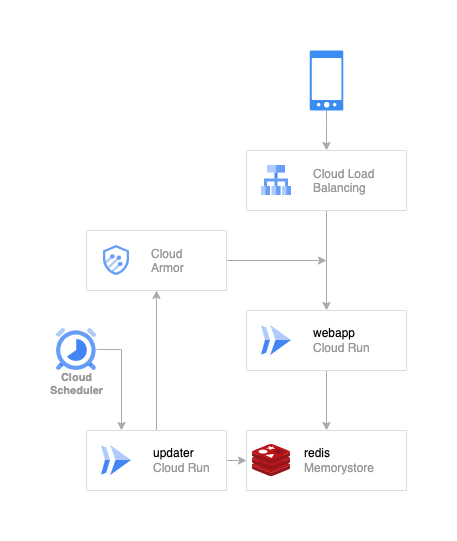
Components:
- webapp - simple web service deployed on Cloud Run
- memorystore - A redis instance
- updater - Cloud Armor updater web app deployed on Cloud Run
- trigger - Cloud Scheduler
- load balancer - the entry point for webapp with Cloud Armor enabled
The implementation
Let’s start by setting up some environment variables:
PROJECT_ID=$(gcloud config list project --format='value(core.project)')
REGION=us-central1
REDIS_INSTANCE=armor-redis
REDIS_CONNECTOR=redis-connector
WEBAPP_NAME=webapp
Our first component in the dependency chain is the redis server.
gcloud redis instances create $REDIS_INSTANCE \
    --project=$PROJECT_ID \
    --region=$REGION \
    --size=1 \
    --tier=basic \
    --redis-version=redis_6_x
This operation takes a while to complete, so you can grab a coffee or a snack.
Grab the internal address of the redis instance.
REDIS_HOST=$(gcloud redis instances describe $REDIS_INSTANCE \
    --format="value(host)" \
    --project=$PROJECT_ID \
    --region=$REGION)
REDIS_PORT=$(gcloud redis instances describe $REDIS_INSTANCE \
    --format="value(port)" \
    --project=$PROJECT_ID \
    --region=$REGION)
echo $REDIS_HOST:$REDIS_PORT
In order to be able to access this redis instance from a Cloud Run service we need to configure the Serverless VPC Access.
gcloud services enable vpcaccess.googleapis.com

gcloud compute networks vpc-access connectors create $REDIS_CONNECTOR \
    --network=default \
    --project=$PROJECT_ID \
    --region=$REGION \
    --range="10.8.0.0/28"
Deploy the web application
Clone the demo repository.
git clone https://github.com/gabihodoroaga/fail2ban-cloudArmor.git
cd fail2ban-cloudArmor
Make sure that the cloud build service account has the necessary permissions to deploy a cloud run service.
PROJECT_NUMBER=$(gcloud projects list \
    --filter="$PROJECT_ID" \
    --format="value(PROJECT_NUMBER)")
CLOUD_BUILD_ACCOUNT="$PROJECT_NUMBER@cloudbuild.gserviceaccount.com"

gcloud projects add-iam-policy-binding $PROJECT_ID \
    --member="serviceAccount:$CLOUD_BUILD_ACCOUNT" \
    --role="roles/run.admin"

gcloud projects add-iam-policy-binding $PROJECT_ID \
    --member="serviceAccount:$CLOUD_BUILD_ACCOUNT" \
    --role="roles/iam.serviceAccountUser"
And then run the deployment script.
gcloud builds submit \
    --config webapp/cloudbuild.yaml \
    --substitutions="_PROJECT=$PROJECT_ID,_REGION=$REGION,_REDIS_HOST=$REDIS_HOST:$REDIS_PORT,_REDIS_CONNECTOR=$REDIS_CONNECTOR" \
    --project=$PROJECT_ID \
    --region=$REGION \
    .
Expose the application to the world
After the service has been deployed, the next step is to create a NEG (Network Endpoint Group). A network endpoint group (NEG) is a configuration object that specifies a group of backend endpoints or services. You can read the full documentation here: Network endpoint groups overview.
Create the NEG.
gcloud compute network-endpoint-groups create webapp-neg \
    --project=$PROJECT_ID \
    --region=$REGION \
    --network-endpoint-type=serverless  \
    --cloud-run-service=webapp
Create the backend service.
gcloud compute backend-services create webapp-backend \
    --load-balancing-scheme=EXTERNAL \
    --global
Add the serverless NEG as a backend to the backend service.
gcloud compute backend-services add-backend webapp-backend \
    --global \
    --network-endpoint-group=webapp-neg \
    --network-endpoint-group-region=$REGION
Create the url map.
gcloud compute url-maps create webapp-map \
  --default-service webapp-backend
Next we need a ssl certificate. For the purpose of this demo a self-sign certificate will be used. In production a real certificate must be used.
openssl req -x509 -newkey rsa:2048 \
    -keyout key.pem -nodes -out cert.pem -sha256 -days 365
gcloud compute ssl-certificates create webapp-cert \
    --certificate cert.pem \
    --private-key key.pem
Create the https proxy.
gcloud compute target-https-proxies create webapp-http-proxy \
    --ssl-certificates webapp-cert \
    --url-map webapp-map
Create the global forwarding rule.
gcloud compute forwarding-rules create webapp-forwarding-rule \
    --load-balancing-scheme=EXTERNAL \
    --network-tier=PREMIUM \
    --global \
    --ports 443 \
    --target-https-proxy webapp-http-proxy
Give a few minutes for the load balancer to setup.
# get the public ip address
IP_ADDRESS=$(gcloud compute forwarding-rules describe webapp-forwarding-rule \
    --global \
    --format="value(IPAddress)")
# print the public ip address
echo $IP_ADDRESS
# make a request to the service
curl -sk -I https://$IP_ADDRESS/ping
Configure Cloud Armor and the updater
Next step is to create a new security policy, which will contain the default rule.
gcloud compute security-policies create webapp-security-policy \
    --type=CLOUD_ARMOR_EDGE
After the security policy has been created, we need to attach it to the backend service.
gcloud compute backend-services update webapp-backend \
    --edge-security-policy=webapp-security-policy \
    --global
Armor Updater is a web application hosted on Cloud Run with the purpose to read all the banned IPs form redis and update the Cloud Armor security policy.
gcloud builds submit \
    --config updater/cloudbuild.yaml \
    --substitutions="_PROJECT=$PROJECT_ID,_REGION=$REGION,_REDIS_HOST=$REDIS_HOST:$REDIS_PORT,_REDIS_CONNECTOR=$REDIS_CONNECTOR,_SECURITY_POLICY_NAME=webapp-security-policy" \
    --project=$PROJECT_ID \
    --region=$REGION \
    .
The full source code of the updater can be found on GitHub. The updater was written as a POC and has room for a lot of improvement and optimization, but it is good enough to showcase this situation.
The update will be triggered by Cloud Scheduler at regular intervals, but first we need the updater url.
UPDATER_URL=$(gcloud run services describe updater \
    --format 'value(status.url)' \
    --project=$PROJECT_ID \
    --region=$REGION)

echo $UPDATER_URL
Create the scheduler.
gcloud scheduler jobs create http armor-updater \
    --project=$PROJECT_ID \
    --location=$REGION \
    --schedule='*/2 * * * *' \
    --uri="$UPDATER_URL/update_armor" \
    --http-method=GET \
    --oidc-service-account-email="$PROJECT_NUMBER-compute@developer.gserviceaccount.com" \
    --oidc-token-audience=$UPDATER_URL
You can check the status of the scheduler by running the next command.
gcloud scheduler jobs describe armor-updater \
    --project=$PROJECT_ID \
    --location=$REGION
Or you can use this link: Cloud Scheduler.
Test
Now it’s the time to test the entire setup.
Make sure you still have the load balancer IP address.
echo $IP_ADDRESS
Call the endpoint 4 times with 4 different account IDs.
curl -skv -X POST https://$IP_ADDRESS/info \
   -H 'Content-Type: application/json' \
   -d '{"account_id":"a1","name":"a1"}'

curl -skv -X POST https://$IP_ADDRESS/info \
   -H 'Content-Type: application/json' \
   -d '{"account_id":"a2","name":"a2"}'

curl -skv -X POST https://$IP_ADDRESS/info \
   -H 'Content-Type: application/json' \
   -d '{"account_id":"a3","name":"a3"}'

curl -skv -X POST https://$IP_ADDRESS/info \
   -H 'Content-Type: application/json' \
   -d '{"account_id":"a4","name":"a4"}'
After the fifth call you should receive return code 403.
curl -skv -X POST https://$IP_ADDRESS/info \
   -H 'Content-Type: application/json' \
   -d '{"account_id":"a5","name":"a5"}'
Wait 2 minutes and try again.
curl -skv -X POST https://$IP_ADDRESS/info \
   -H 'Content-Type: application/json' \
   -d '{"account_id":"a5","name":"a5"}'
This time, the return code should be 502, which means that the Cloud Armor policy has been updated and it’s denying traffic originated from your IP.
Done!
Cleaning up
In order to remove all the resources created and avoid unnecessary charges, run the following commands:
# delete the cloud scheduler
gcloud -q scheduler jobs delete armor-updater --project=$PROJECT_ID --location=$REGION
# delete the updater
gcloud -q run services delete updater --project=$PROJECT_ID --region=$REGION
# delete the forwarding-rule aka frontend
gcloud -q compute forwarding-rules delete webapp-forwarding-rule --global
# delete the https proxy
gcloud -q compute target-https-proxies delete webapp-http-proxy
# delete ssl certificate
gcloud -q compute ssl-certificates delete webapp-cert
# delete the url map
gcloud -q compute url-maps delete webapp-map
# delete the backend
gcloud -q compute backend-services delete webapp-backend --global
# delete the neg
gcloud -q compute network-endpoint-groups delete webapp-neg --project=$PROJECT_ID --region=$REGION
# delete the security policy
gcloud -q compute security-policies delete webapp-security-policy
# delete the web app
gcloud -q run services delete webapp --project=$PROJECT_ID --region=$REGION
# delete the redis connector
gcloud -q compute networks vpc-access connectors delete $REDIS_CONNECTOR --project=$PROJECT_ID --region=$REGION
# delete the redis instance
gcloud -q redis instances delete $REDIS_INSTANCE --project=$PROJECT_ID --region=$REGION
Improvements
- redis - update IP - make it atomic using transactions with Lua scripts
- handle - add ipv6 to Cloud Armor - use /32
- improve - priority calculation for Cloud Armor security policy
Conclusion
With very little effort and combining multiple GCP services together, Cloud Armor can become a very effective tool to keep the bad guys away.