IAP on GKE
There are many “internal only” applications used by a company and the way to deal with this in the past was “Do not expose them to the internet”, and if someone wants to access the app from outside “use VPN”.
Things are changing now and migration to a public cloud brings a lot more advantages and saves costs but, how to make sure that this “internal only” applications are safe, that someone will not to try to hack them, break them, or abuse them.
Turns out there is a way to use google security to protect your applications, and in this tutorial I will show you how to do it.
Prerequisites
- GCP project with billing enabled. If you don’t have one then sign-in to Google Cloud Platform Console and create a new project
- Access to a standard internet browser
Solution
A short overview of the solution:
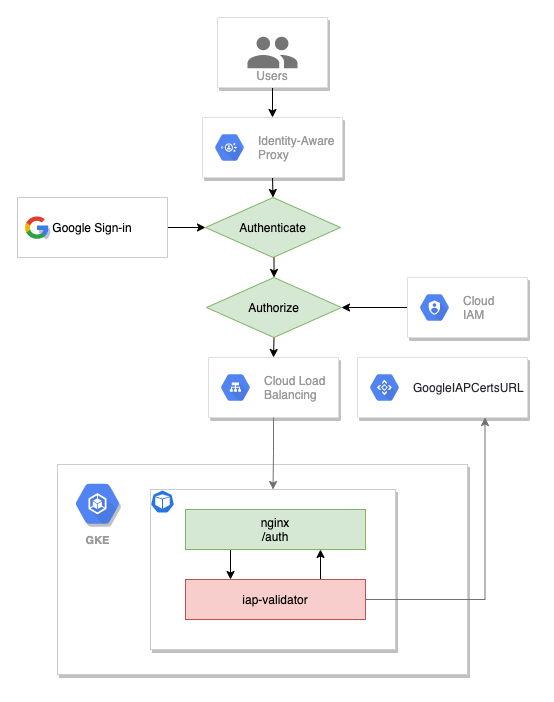
Identity-Aware Proxy is a product from GCP that allows you to use identity and context to guard access to your applications and VMs.
For this demo we will deploy an nginx application on a GKE cluster, expose the app using a service with a IAP activate backend configuration, add the ingress so it will create an http(s) load balancer, add a sidecar JWT IAP validator.
Setup
In order to use IAP you need to setup the “OAuth consent screen” and this part cannot be done using command line.
Configuring the OAuth consent screen
- Go to the OAuth consent screen in the “APIs & Services” section
- Choose “External” and then hit “Create”
- Under Support email, select the email address you want to display as a public contact. This email address must be your email address, or a Google Group you own.
- Enter the Application name you want to display.
- Click Save.
- Navigate again to the OAuth consent screen and add your user to the list of the test users.
Creating OAuth credentials
- Go to the Credentials page in the “APIs & Services” section
- On the Create credentials drop-down list, select *OAuth client ID.
- Under Application type, select Web application.
- Add a Name for your OAuth client ID.
- Click Create. Your OAuth client ID and client secret are generated and displayed on the OAuth client window.
- Click OK.
- Select the client that you created.
- Copy the client ID to the clipboard.
- Add the universal redirect URL to the authorized redirect URIs field in the following format:
https://iap.googleapis.com/v1/oauth/clientIds/CLIENT_ID:handleRedirect
where CLIENT_ID is the OAuth client ID that you just created and it should be similar to this
75641163784-some-random-number.apps.googleusercontent.com
Enable IAP
All commands can be executed from Cloud Shell for the next steps.
Now let’s define the variables
PROJECT_ID=$(gcloud config list project --format='value(core.project)')
ZONE=us-west1-a
CLUSTER_NAME=demo-cluster
CLIENT_ID=[YOUR_CLIENT_ID]
CLIENT_SECRET=[YOUR_CLIENT_ID]
Make sure to update the values for CLIENT_ID and CLIENT_SECRET from the previous step.
Create the GKE cluster
gcloud container clusters \
        create $CLUSTER_NAME \
        --zone $ZONE --machine-type "e2-medium" \
        --enable-ip-alias \
        --num-nodes=2
Deploy a simple nginx app to the cluster
cat << EOF > app-deployment.yaml
apiVersion: apps/v1
kind: Deployment
metadata:
  name: nginx
spec:
  selector:
    matchLabels:
      app: nginx
  template:
    metadata:
      labels:
        app: nginx
    spec:
      containers:
      - name: nginx
        image: nginx:latest
        ports:
        - containerPort: 80
EOF
kubectl apply -f app-deployment.yaml
Create a GKE secret for the oauth client credentials
kubectl create secret generic oauth-client-secret \
    --from-literal=client_id=$CLIENT_ID \
    --from-literal=client_secret=$CLIENT_SECRET
Create the backend configuration
cat << EOF > app-backend-config.yaml
apiVersion: cloud.google.com/v1
kind: BackendConfig
metadata:
  name: app-bc
spec:
  iap:
    enabled: true
    oauthclientCredentials:
      secretName: oauth-client-secret
EOF
kubectl apply -f app-backend-config.yaml
Create the service
cat << EOF > app-service.yaml
apiVersion: v1
kind: Service
metadata:
  name: app-service
  annotations:
    cloud.google.com/backend-config: '{"default": "app-bc"}'
    cloud.google.com/neg: '{"ingress": true}'
spec:
  type: ClusterIP
  ports:
  - port: 80
    targetPort: 80
  selector:
    app: nginx
EOF
kubectl apply -f app-service.yaml
Warning: Do not use named ports for target port. There is a bug in the “Ingress GCE” that prevents the pods to be added to the network endpoint group.
IAP requires a HTTPS endpoint and for this we need a certificate. It will be a self signed certificate for this demo.
openssl req -nodes -x509 -newkey rsa:2048 -keyout key.pem -out cert.pem -days 365
Create a k8s secret
kubectl create secret tls ingress-tls-secret \
  --cert=cert.pem \
  --key=key.pem
Create the ingress
cat << EOF > app-ingress.yaml
apiVersion: networking.k8s.io/v1
kind: Ingress
metadata:
  name: app-ingress
spec:
  tls:
  - secretName: ingress-tls-secret
  rules:
  - host: ""
    http:
      paths:
      - path: /*
        pathType: ImplementationSpecific
        backend:
          service:
            name: app-service
            port:
              number: 80
EOF
kubectl apply -f app-ingress.yaml
Wait for the ingress to create the load balancer and the backend services.
Let’s try to get the public ip address of our ingress
IP_ADDRESS=$(kubectl get ingress app-ingress \
             -o jsonpath='{.status.loadBalancer.ingress[0].ip}') \
             && echo $IP_ADDRESS
If you navigate to the IP_ADDRESS you will be redirected to the google login page, sign-in with you account and after login you will see a page like this.
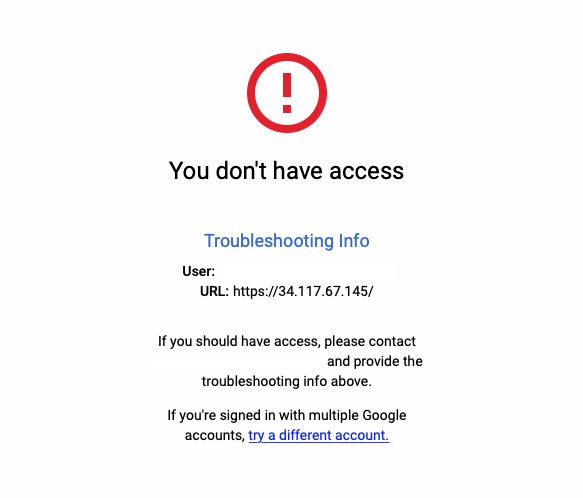
And this is ok. IAP is working.
Next we need to add users to our backed service. Let’s get the current user email add the name of the backend service
BACKEND_SERVICE=$(gcloud compute backend-services list --filter="name~'app-service'" --format="value(name)")
USER_EMAIL=$(gcloud config list account --format "value(core.account)")
and then grant the role IAP-secured Web App User (roles/iap.httpsResourceAccessor)
gcloud iap web add-iam-policy-binding \
    --resource-type=backend-services \
    --service $BACKEND_SERVICE \
    --member=user:$USER_EMAIL \
    --role='roles/iap.httpsResourceAccessor'
Wait a bit and then refresh the page. You should see the nginx welcome page.
More security
IAP protects the application only if the traffic is coming from the load balancer.
But, if:
- IAP is accidentally disabled, or
- the application is accessed from within the project, or
- you have misconfigured firewall rules
the application is not protected anymore.
You can easily check this by running next command from Cloud Shell
kubectl run -i --tty --rm curl \
    --image=radial/busyboxplus:curl \
    -- curl http://app-service
You will see the nginx default home page.
To properly secure your app, you must use signed headers for all app types. This means to validate if the request comes from IAP or not.
When a request comes from IAP it will have a JWT token in the x-goog-iap-jwt-assertion header. There is a very detailed information about how to validate this header here Securing your app with signed headers.
If you don’t have the option to change the original application, there is a way to secure it by using a sidecar container and reconfigure nginx to authorize every request.
First, let’s create the nginx config file and create a ConfigMap from it
cat << EOF > nginx.conf
server {
    listen       80;
    root    /usr/share/nginx/html;
    index   index.html index.htm;

    location / {
        auth_request /auth;
    }
    location = /hc {
        return 200;
    }

    location = /auth {
        internal;
        proxy_pass              http://127.0.0.1:8081;
        proxy_pass_request_body off;
        proxy_set_header        Content-Length "";
    }
}
EOF
kubectl create configmap nginx-config --from-file=nginx.conf
For the sidecar validator I will use this image gabihodoroaga/iap-validator and the source code from here github.com/gabihodoroaga/gcp-iap-jwt-validator
The validator will query the google metadata server in order to obtain the required information for the token validation. More specifically the audience field has the form /projects/projectNumber /global/backendServices/backendServiceId. The projectNumber and the backendServiceId required. The iap-validator has more options than presented here. You should check the source repository.
Let’s create a service account
# create the service account
gcloud iam service-accounts create iap-validator-svc \
  --display-name "Service Account for IAP validator sidecar"
# grant user permissions
gcloud projects add-iam-policy-binding ${PROJECT_ID} \
  --member serviceAccount:iap-validator-svc@${PROJECT_ID}.iam.gserviceaccount.com \
  --role roles/browser \
  --role roles/compute.viewer
and generate the key and save it as a secret
gcloud iam service-accounts keys create key.json \
  --iam-account iap-validator-svc@${PROJECT_ID}.iam.gserviceaccount.com
kubectl create secret generic iap-validator-svc-key --from-file=key.json
Update the deployment to include the iap-validator and the nginx.conf
cat << EOF > app-deployment.yaml
apiVersion: apps/v1
kind: Deployment
metadata:
  name: nginx
spec:
  selector:
    matchLabels:
      app: nginx
  template:
    metadata:
      labels:
        app: nginx
    spec:
      containers:
      - name: nginx
        image: nginx:latest
        ports:
        - containerPort: 80
        volumeMounts:
        - name: nginx-config
          mountPath: /etc/nginx/conf.d/default.conf
          subPath: nginx.conf
      - name: iap-validator
        image: gabihodoroaga/iap-validator
        command:
        - /app/iapvalidator
        - -v=1
        env:
        - name: PROJECT_ID
          value: $PROJECT_ID
        - name: SERVICE_NAME
          value: app-service
        - name: GOOGLE_APPLICATION_CREDENTIALS
          value: /var/secrets/google/key.json
        volumeMounts:
        - mountPath: /var/secrets/google
          name: google-cloud-key
      volumes:
      - name: google-cloud-key
        secret:
          secretName: iap-validator-svc-key
      - name: nginx-config
        configMap:
          name: nginx-config
EOF
kubectl apply -f app-deployment.yaml
We also need to update the backend config to use a different health check path, otherwise the backend will not be considered healthy and the load balancer will not redirect traffic to this backend.
cat << EOF > app-backend-config.yaml
apiVersion: cloud.google.com/v1
kind: BackendConfig
metadata:
  name: app-bc
spec:
  iap:
    enabled: true
    oauthclientCredentials:
      secretName: oauth-client-secret
  healthCheck:
    type: HTTP
    requestPath: /hc
EOF
kubectl apply -f app-backend-config.yaml
You should be able to see the same welcome page form your browser.
Try to access to application from Cloud Shell using this command
kubectl run -i --tty --rm curl \
    --image=radial/busyboxplus:curl \
    -- curl http://app-service
you should get this
<html>
<head><title>401 Authorization Required</title></head>
<body>
<center><h1>401 Authorization Required</h1></center>
<hr><center>nginx/1.21.0</center>
</body>
</html>
Now the application is secured. You cannot bypass the IAP anymore.
Cleaning up
All resources used in this post are billable, so let’s clean up and avoid unnecessary costs
# delete the cluster
gcloud -q container clusters delete $CLUSTER_NAME --zone=$ZONE
# delete the service account
gcloud -q iam service-accounts delete iap-validator-svc@${PROJECT_ID}.iam.gserviceaccount.com
Conclusion
Identity Aware Proxy on GCP the most efficient way to add the best security to legacy application when you migrate to cloud.