Scalable Prestashop on GKE
In one of my previous posts I wrote about How to setup a media server for Prestashop and it worked very well for a long time, but now the time came to migrate the site completely to GCP and this was not an easy task as Prestashop was not originally created to scale horizontally.
In this blog post I will explain how to deploy Prestashop in Google Kubernetes Engine(GKE) and to be able to scale it horizontally to handle millions of users.
TL;DR
You can find the source code for this solution in this repository github.com/gabihodoroaga/gke-prestashop-deployment.
Architecture
This is the solution architecture
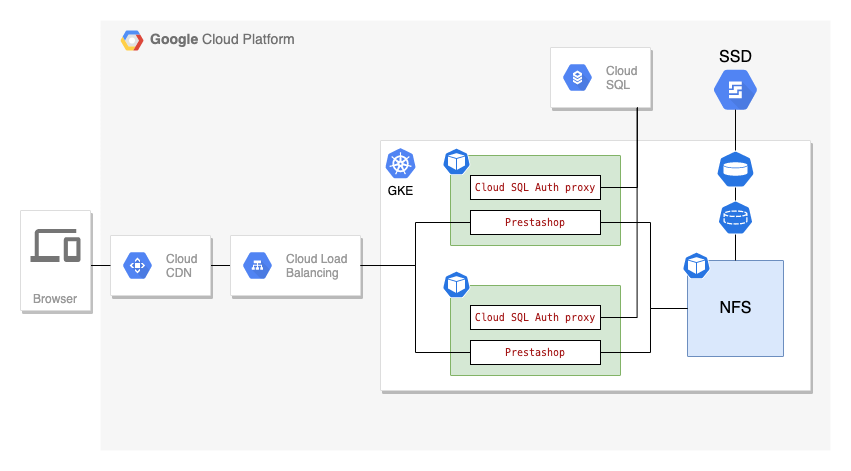
Components:
- Cloud SQL
- GKE
- NFS Server
- Prestashop
- GCE Ingress
- Cloud CDN
- Cloud Load Balancer
NFS Server is required here because Prestashop persist some of the user information to disk, like product images and attachments, cached smarty templates and all these files need to be shared across all instances.
Prerequisites
- GCP project with billing enabled. If you don’t have one then sign-in to Google Cloud Platform Console and create a new project
- Access to a standard internet browser
Setup
In the this section you will find the steps required to deploy a new store to GKE and scale it.
Prepare the tools
First sign-in to your GCP Console and activate the Cloud Shell and clone this repository
git clone https://github.com/gabihodoroaga/gke-prestashop-deployment.git
cd gke-prestashop-deployment
Prepare the Prestashop files
For this step we will use the official prestashop docker image and we will extract all the required files. You can skip this step if you want to migrate an existing prestashop site.
Deploy Prestashop inside Cloud Shell VM, this is just temporary
# create a docker network
docker network create prestashop-net
# deploy mysql
docker run -ti -p 3307:3306 --network prestashop-net \
        --name some-mysql -e MYSQL_ROOT_PASSWORD=admin -d mysql \
        --character-set-server=utf8 \
        --default-authentication-plugin=mysql_native_password \
        --sql-mode=ERROR_FOR_DIVISION_BY_ZERO,NO_ENGINE_SUBSTITUTION
# create a database - wait a few seconds before
docker exec -it some-mysql mysql -u root -p'admin' \
            -e "CREATE DATABASE prestashop"
# deploy prestashop
docker run -ti --name some-prestashop --network prestashop-net \
        -e DB_SERVER=some-mysql \
        -e PS_DOMAIN=ps.example.com \
        -e PS_INSTALL_AUTO=1 \
        -p 8080:80 -d prestashop/prestashop:latest
Extract all the information that we need from the running docker containers
# backup database
mkdir database
docker exec some-mysql mysqldump -u root -p'admin' \
            prestashop > database/prestashop.sql
# extract the files out from docker image
docker cp some-prestashop:/var/www/html prestashop/
mv prestashop/html/admin prestashop/html/admin942
chmod a+rw -R prestashop/html/var
mkdir prestashop/nfs
mv prestashop/html/img prestashop/nfs
mv prestashop/html/download prestashop/nfs
mv prestashop/html/cache prestashop/nfs
mkdir -p prestashop/nfs/themes/classic/cache
mkdir -p prestashop/nfs/themes/classic/assets/cache
mkdir -p prestashop/nfs/var/log
mkdir prestashop/nfs/config
mv prestashop/html/config/xml prestashop/nfs/config
chmod a+rw -R prestashop/nfs
Create a new Prestashop image
Now that we have all the required files let’s setup some variables that we will use later
MYSQL_NAME=demo-ps-mysql-2
MYSQL_ROOT_PASS=admin
REGION=us-central1
ZONE=us-central1-a
CLUSTER_NAME=demo-ps-cluster
PROJECT_ID=$(gcloud config list project --format='value(core.project)')
Enable Cloud SQL API, just in case is not already enabled
gcloud services enable sqladmin.googleapis.com
Next we need to create a new Prestashop docker image, based on php 7.3 alpine and with nginx.
For this I used a custom php image from here gabihodoroaga/php-nginx:7.3-fpm-alpine. You ca find the source code in the repository.
# build the image
docker build -t mypresta prestashop/
# tag the image
docker tag mypresta gcr.io/$PROJECT_ID/mypresta:1.0.1
# push the image to container registry
docker push gcr.io/$PROJECT_ID/mypresta:1.0.1
When you build this image you have to make sure that all files have the correct permissions otherwise you will get the permission denied error.
Prepare the database
Next we need create our Cloud SQL instance
gcloud sql instances create $MYSQL_NAME  --database-version=MYSQL_8_0 \
    --tier=db-g1-small  --region=$REGION --root-password=admin \
    --database-flags=^+^character-set-server=utf8+default-authentication-plugin=mysql_native_password+sql-mode=ERROR_FOR_DIVISION_BY_ZERO,NO_ENGINE_SUBSTITUTION
In order to connect from Cloud Shell to our mysql instance we will use Cloud SQL Auth proxy
cloud_sql_proxy -instances=$PROJECT_ID:$REGION:$MYSQL_NAME=tcp:3306
On a separate cloud shell terminal window, run the following commands to create the database
MYSQL_ROOT_PASS=admin
cd gke-prestashop-deployment
mysql -u root -p$MYSQL_ROOT_PASS -h 127.0.0.1 -e "CREATE DATABASE prestashop;"
mysql -u root -p$MYSQL_ROOT_PASS -h 127.0.0.1 prestashop < database/prestashop.sql
Return to the initial terminal window and press CTRL+C to terminate the cloud_sql_proxy process.
Prepare the GKE cluster
Now, that we have the database in place, we need to create the GKE cluster.
We will use only 2 nodes here, just to save some resources, and we need to add a special scope sql-admin to the default scopes in order to allow access from VM to Cloud SQL API.
gcloud container clusters \
        create $CLUSTER_NAME \
        --zone $ZONE --machine-type "e2-medium" \
        --enable-ip-alias \
        --num-nodes=2 --scopes=gke-default,sql-admin
Create the NFS server deployment
First we need to create a compute disk
gcloud compute disks \
        create nfs-pv-disk --size=10GB \
        --type=pd-ssd --zone=$ZONE
Deploy NFS server
# persistent volume
kubectl apply -f gke/nfs/nfs-persistent-volume.yaml
# persistent volume claim
kubectl apply -f gke/nfs/nfs-persistent-volume-claim.yaml
# deployment
kubectl apply -f gke/nfs/nfs-deployment.yaml
# service
kubectl apply -f gke/nfs/nfs-service.yaml
In order to transfer the Prestashop user files we need to mount the nfs volume to Cloud Shell machine
# get the required information
NFS_NODE_PORT=$(kubectl get service service-nfs -o=jsonpath='{.spec.ports[?(@.name=="nfs")].nodePort}')
NFS_NODE_ADDRESS=$(kubectl get nodes -o jsonpath='{.items[0].status.addresses[?(@.type=="ExternalIP")].address}')
GKE_NETWORK_TAG=$(gcloud compute instances describe $(kubectl get nodes -o jsonpath='{.items[0].metadata.name}') --zone=$ZONE --format="value(tags.items[0])")
SHELL_IP_ADDRESS=$(curl http://ifconfig.me)
# update firewall - never expose more than is required
gcloud compute firewall-rules create ps-demo-nfs \
    --direction=INGRESS --priority=1000 --network=default \
    --action=ALLOW --rules=tcp:$NFS_NODE_PORT \
    --source-ranges=$SHELL_IP_ADDRESS \
    --target-tags=$GKE_NETWORK_TAG
# copy files
sudo mkdir -p /mnt/nfs/ps
sudo chmod a+rw /mnt/nfs/ps
sudo apt-get -y install nfs-common
sudo mount -t nfs4 -o port=$NFS_NODE_PORT $NFS_NODE_ADDRESS:/ /mnt/nfs/ps
sudo mkdir /mnt/nfs/ps/psdata
sudo cp -r prestashop/nfs/* /mnt/nfs/ps/psdata
# wait for the files to copy, it might take a while, I don't know why
sudo chmod a+rw -R /mnt/nfs/ps/psdata
# cleanup
sudo umount /mnt/nfs/ps
gcloud -q compute firewall-rules delete ps-demo-nfs
Setup the Prestashop deployment
In order to connect from GKE to Cloud SQL we will use Cloud SQL Auth proxy deployed as a sidecar to our Prestashop deployment. The next steps are taken form this GCP guide
# create the service account
gcloud iam service-accounts create ps-mysql-user-2 \
    --description="A service account to access mysql" \
    --display-name="ps-mysql-user-2"
# get the service account email address
SQL_SERVICE_ACCOUNT=$(gcloud iam service-accounts list --format="value(email)" --filter="displayName=ps-mysql-user-2")
# add the require roles
gcloud projects add-iam-policy-binding ${PROJECT_ID} \
    --member=serviceAccount:${SQL_SERVICE_ACCOUNT} \
    --role=roles/cloudsql.client
# create the service account key
gcloud iam service-accounts keys create gke/presta/key.json \
  --iam-account ${SQL_SERVICE_ACCOUNT}
# save key the ke as k8s secret
kubectl create secret generic ps-mysql-credentials \
--from-file=service_account.json=gke/presta/key.json
We need to store the mysql root password as a kubernetes secret too
kubectl create secret generic mysql-pass \
        --from-literal=password=$MYSQL_ROOT_PASS
Next we will create the persistent volume and the persistent volume claim that connects to our NFS server, we will use it to map folders inside the Prestashop container
# create the persistent volume
kubectl apply -f gke/presta/ps-persistent-volume.yaml
# create the persistent volume claim
kubectl apply -f gke/presta/ps-persistent-volume-claim.yaml
# export the instance name as environment variable
export INSTANCE_CONNECTION_NAME=$PROJECT_ID:$REGION:$MYSQL_NAME
export PROJECT_ID=$PROJECT_ID
# create the deployment
cat gke/presta/ps-deployment.yaml | envsubst | kubectl apply -f -
# create the service and the backend config
kubectl apply -f gke/presta/ps-backend-config.yaml
kubectl apply -f gke/presta/ps-service.yaml
The backend config is required here in order to enable Cloud CDN.
Next we need to create our ingress. In GKE, the Ingress object defines rules for routing HTTP(S) traffic to applications running in a cluster. You can read more about this on page GKE Ingress for HTTP(S) Load Balancing
kubectl apply -f gke/ingress/ps-ingress.yaml
Wait for the ingress to finish creating all the services: backend services, load balancer, cdn, etc.
Let’s grab the external ip address of our ingress controller
IP_ADDRESS=$(kubectl get ingress ingress-psweb \
             -o jsonpath='{.status.loadBalancer.ingress[0].ip}') \
             && echo $IP_ADDRESS
and use curl to test
curl --head http://ps.example.com/ \
        --resolve ps.example.com:80:$IP_ADDRESS
you should see a result similar to this
HTTP/1.1 200 OK
Server: nginx
Date: Tue, 25 May 2021 12:36:49 GMT
Content-Type: text/html; charset=utf-8
Vary: Accept-Encoding
X-Powered-By: PHP/7.3.28
Expires: Thu, 19 Nov 1981 08:52:00 GMT
Cache-Control: no-store, no-cache, must-revalidate
Pragma: no-cache
X-Backend-Server: server-psweb-79df96f6f5-abc
Via: 1.1 google
Transfer-Encoding: chunked
and if you execute the command multiple times you should be able to see that the header value X-Backend-Server is changing, and this means that multiple backend are serving the request.
If you update your /etc/hosts file to point to ps.example.com you can view the online shop in your browser. For the admin page you must access ps.example.com/admin942 and the user is demo@prestashop.com with password prestashop_demo.
Done!
Cleaning up
To remove all the resources you can either delete the project or run the clean-up scripts.
# delete the cluster
gcloud -q container clusters delete $CLUSTER_NAME --zone=$ZONE
# delete the sql instance
gcloud -q sql instances delete $MYSQL_NAME
# delete the service account
gcloud -q iam service-accounts delete $SQL_SERVICE_ACCOUNT
# delete the disc
gcloud -q compute disks delete nfs-pv-disk --zone=$ZONE
# delete container registry images
gcloud -q container images delete gcr.io/$PROJECT_ID/mypresta:1.0.1
Conclusion
Kubernetes is a great platform to deploy web applications and scale as needed. With GKE is even better because you have all cluster management, nodes management, logging, monitoring, and so on taken cared by GCP, and you can concentrate only on deploying the apps, and the most important part is that it just works. I created, deleted, deployed all the services hundred times until I finished this post and everything worked perfect every time.