How to setup a media server for Prestashop on Google Cloud Platform
Prestashop is one of the most popular platform for e-commerce, it’s open-source and has more then 300,000 online stores according their website. www.prestashop.com.
This platform has a very useful feature called “media server” which allows you to configure another domain or subdomain to deliver the static content of the website and this should improve the online store performance as: (1) avoids unnecessary cookie network traffic; (2) allows static content to be cached by a CDN (Content Delivery Network).
In this blog post I will show how use Google Global Load Balancer and Google Cloud CDN as a media server for Prestashop to boost your online store speed.
Architecture
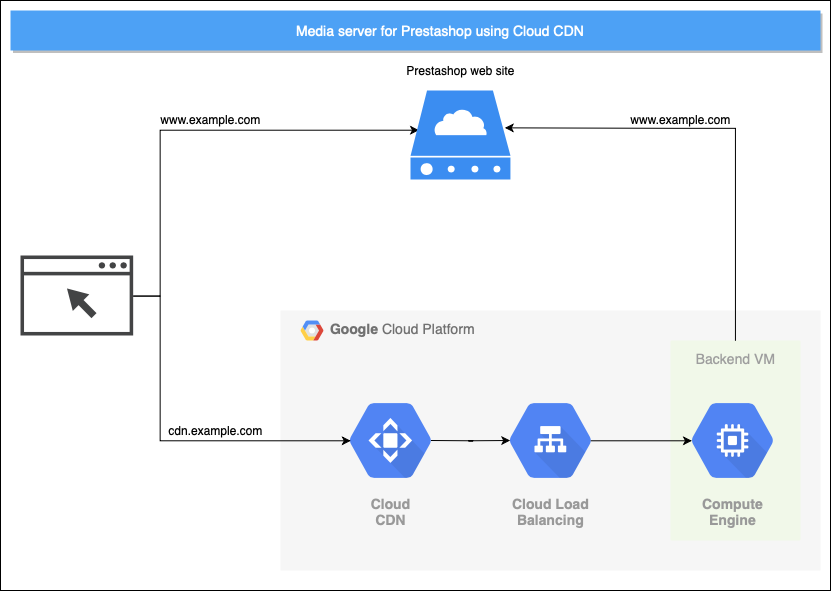
Components:
- Prestashop site
- Google Global Load Balancer, with Cloud CDN enabled
- Backend VM (nginx)
When you setup a media server, Prestashop will update all the static content urls to use the media server domain. For example all the images will have the url like http://cdn.example.com/img/test_image.png instead of http://www.example.com/img/test_image.png. The domain cdn.example.com will point to the our GCP Load Balancer with Cloud CDN enabled.
Next the load balancer will proxy the requests to the Backend VM and the Backend VM will proxy the request back to the original Prestashop site.
By routing the traffic through the GCP Load Balancer will allow the Cloud CDN to cache the static content at the edges. After the static content has been cached it will be delivered from the cache for all the subsequent requests. You can find out more about how the Cloud CDN works from the official documentation Google Cloud CDN.
A response is cached by the Cloud CDN only if ALL of the following are true:
- It was served by a backend service or backend bucket with Cloud CDN enabled.
- It is a response to a GET request.
- Its status code is 200, 203, 206, 300, 301, 302, 307, or 410.
- It has a Cache-Control: public header.
- It has a Cache-Control: s-maxage, Cache-Control: max-age, or Expires header.
- It has a Content-Length, Content-Range, or Transfer-Encoding header.
- Its size is less than or equal to the maximum size.
Setup
Prerequisites:
- GCP project with billing enabled. If you don’t have one then sign-in to Google Cloud Platform Console and create a new project
- Access to a standard internet browser
Let’s start!
First sign-in to your GCP Console and activate the Cloud Shell.
Setup the environment variables:
INSTANCE_NAME=ps-media
ZONE=europe-west3-c
PRESTASHOP_WEBSITE=http://www.example.com
MEDIA_SERVER_NAME=cdn.example.com
Create the backend virtual machine that will proxy our the CDN request back to the original site.
gcloud compute instances create-with-container $INSTANCE_NAME-vm \
    --container-image gcr.io/cloud-marketplace/google/nginx1:1.15 \
    --machine-type f1-micro \
    --tags $INSTANCE_NAME-http \
    --zone $ZONE
Nginx 1.15 is used here as the reverse proxy for this setup.
Because this VM has only one purpose, and that is to proxy all the requests back to the current Prestashop site, we will use the “Containers on VM” feature on GCP. This option allows you to deploy a docker container on a virtual machine without having to worry about the os, runtime, docker, etc. You can find more info about how to deploy container on virtual machines from the official documentation. Deploying containers on VMs
Add the cloud-init script that creates the nginx configuration file (nginx.conf).
# download vm-cloud-init.yaml
curl https://gist.githubusercontent.com/gabihodoroaga/02b74add2b72d1942df13ad8ddd529ac/raw \
    --output vm-cloud-init.yaml
# replace the variables names in vm-cloud-init.yaml
sed -i 's/PRESTASHOP_WEBSITE/'"$PRESTASHOP_WEBSITE"'/g' vm-cloud-init.yaml
sed -i 's/MEDIA_SERVER_NAME/'"$MEDIA_SERVER_NAME"'/g' vm-cloud-init.yaml
# add the file to vm metadata
gcloud compute instances add-metadata $INSTANCE_NAME-vm \
    --metadata-from-file user-data=vm-cloud-init.yaml \
    --zone $ZONE
Update the VM to map the nginx.conf file from the host to the container.
gcloud compute instances update-container $INSTANCE_NAME-vm \
    --container-mount-host-path host-path=/var/nginx.conf,mount-path=/etc/nginx/nginx.conf,mode=ro \
    --zone $ZONE
Add the firewall rule to allow the load balancer to access the vm.
gcloud compute firewall-rules create $INSTANCE_NAME-allow-health-check \
    --allow tcp:80 \
    --source-ranges 130.211.0.0/22,35.191.0.0/16 \
    --target-tags $INSTANCE_NAME-http
Create an unmanaged instance group
gcloud compute instance-groups unmanaged create $INSTANCE_NAME-instance-group \
    --zone $ZONE
Add the compute instance to this unmanaged instance group
gcloud compute instance-groups unmanaged add-instances $INSTANCE_NAME-instance-group \
      --instances $INSTANCE_NAME-vm \
      --zone $ZONE
Create a health check for the backend vm
gcloud compute health-checks create http $INSTANCE_NAME-health-check \
  --request-path / \
  --port 80 \
  --check-interval 60 \
  --unhealthy-threshold 3 \
  --healthy-threshold 2 \
  --timeout 5 \
  --host $MEDIA_SERVER_NAME
Heath checks are used by the load balancer to determine if a backend service is alive.
Create a backend service
gcloud compute backend-services create $INSTANCE_NAME-lb-backend \
  --http-health-checks $INSTANCE_NAME-health-check \
  --port-name http \
  --global \
  --enable-cdn \
  --connection-draining-timeout 300
Add the instance group to this backend service
gcloud compute backend-services add-backend $INSTANCE_NAME-lb-backend \
  --instance-group $INSTANCE_NAME-instance-group \
  --instance-group-zone $ZONE \
  --balancing-mode UTILIZATION \
  --max-rate-per-instance 100 \
  --capacity-scaler 1.0 \
  --global
Create the url map
gcloud compute url-maps create $INSTANCE_NAME-url-map \
  --default-service $INSTANCE_NAME-lb-backend
Create the http proxy
gcloud compute target-http-proxies create $INSTANCE_NAME-http-proxy \
  --url-map $INSTANCE_NAME-url-map
Create the global forwarding rule, a.k.a. frontend
gcloud compute forwarding-rules create $INSTANCE_NAME-forwarding-rule \
  --global \
  --ports 80 \
  --target-http-proxy $INSTANCE_NAME-http-proxy
If you want to learn more about the Google Load Balancer check the official documentation Setting Up HTTP(S) Load Balancing
And this is it. Our load balancer is fully functional is is ready to receive traffic.
To check if the load balancer and proxy works as expected run the following commands
# get the public ip address
IP_ADDRESS=$(gcloud compute forwarding-rules describe $INSTANCE_NAME-forwarding-rule --global --format="value(IPAddress)")
# print the public ip address
echo $IP_ADDRESS
# make a request to the service
curl -s -I http://$IP_ADDRESS/
and the output should be similar to this
HTTP/1.1 200 OK
Server: nginx/1.15.12
.....
Next you need to configure Prestashop to use the new media server.
Login to your Prestashop Admin page and navigate to
ADVANCED PARAMETERS -> PERFORMANCE -> MEDIA SERVERS
add there the ip address or subdomain name of the load balancer.

You have now all your static content served from the media server. Open up your browser developer tools and check the urls of your images, javascript and css files.
Testing
You need to do the following checks in order to make sure that all static content is actually cached:
- verify the cache hit ratio Network Service -> Cloud CDN;
- verify how much of your traffic is hitting the backend service.Network Service -> Load balancing -> Backends;
- consult the logs. All request served by the load balancer are logged and the jsonPayload.statusDetails should be either “response_sent_by_backend” or “response_from_cache”;
If your content is not served from the cache then try to troubleshoot by following the next instructions.
In order for the Cloud CDN to cache the content header Cache-Control: public must be present and by default Apache and Prestashop does not set this header.
Add the following settings to your Prestashop Apache configuration file .htaccess.
<IfModule mod_headers.c>
    <filesMatch ".(css|jpg|jpeg|png|gif|js|ico|svg|woff|woff2|eot|ttf|otf)$">
        Header add Cache-Control "public"
    </filesMatch>
</IfModule>
If you receive errors in the browser related to CORS the add this settings also to your .htaccess file
<FilesMatch "\.(ttf|otf|eot|woff|woff2)$">
  <IfModule mod_headers.c>
    Header set Access-Control-Allow-Origin "*"
  </IfModule>
</FilesMatch>
Cached content can be also invalidated. Check out the documentation Cache Invalidation Overview.
Clean-up
To remove all the resources you can either delete the project or download and run the clean-up script.
# download the file
curl https://gist.githubusercontent.com/gabihodoroaga/8b3461de6d989069d17ae29c7f01da1d/raw \
    --output cleanup.sh
# adjust the values for INSTANCE_NAME and ZONE variables
# make the script executable
chmod +x cleanup.sh
# run the script
./cleanup.sh
Conclusion
Using the Google Cloud CDN you can boost your online shop performance as:
- releases your server from the overhead of serving static content
- reduce the network traffic sent to your server
- high speed delivery of static content using the google network.
In my next blog post I plan to write about how to create a scalable Prestashop deployment on GCP that can handle millions of users.